Minimal Linux distribution - Part 2: Kernel + busybox
Last week, I mentioned my goal of building something even more minimal than Linux From Scratch - basically, a DIY Linux system from just a kernel, a few user-space tools, and a bootloader. Well… I think I’ve got it!
If you’re feeling adventurous and want to replicate my setup, here’s how I did it.
The Plan
I’m keeping it simple:
- Compile the Linux Kernel
- Build BusyBox - a tiny userspace suite that replaces core UNIX utilities
- Package it all up into a bootable image using Syslinux
Setting Up the Environment
To build everything, you’ll need a few essential packages. Here’s what I installed:
For the Kernel build:
1
bison flex gawk libelf-dev libncurses-dev libssl-dev make openssl pv qemu-system-x86 tar wget
For BusyBox:
1
bzip2
For assembling & testing everything:
1
cpio qemu-system-x86 dosfstools syslinux
If you’re using apt as your package manager, just run:
1
$ sudo apt install <list_of_packages>
If you’re on a different distro, you might need to find the equivalent packages yourself. But hey, that’s part of the fun, right?
Building Kernel
This process is actually quite straightforward and can be done in a few simple steps.
- Grab sources (I’ll use kernel 6.13 as an example).
1
$ wget https://cdn.kernel.org/pub/linux/kernel/v6.x/linux-6.13.tar.xz - Extract the archive.
1
$ tar -xJf linux-6.13.tar.xz
- Configure the build. Before compiling, we need a configuration file that defines how the kernel will be built, what modules to include, and which debugging features to enable. The simplest way is to use the default config.
1
2
$ cd linux-6.13
$ make defconfig
Note: If you want to make some tweaks in a kernel, instead of running
make defconfigconfig from step above you can callmake menuconfigwhich will compile and run TUI based configuration utility, where particular elements of a kernel can be switched on and off. - Build.
1
$ make -j$(nproc)
The
-j$(nproc)flag tells make to use all available CPU cores for faster compilation. - Wait and let it do its thing. Now’s a good time to grab a coffee, because this step takes a while. Since I’m playing it safe, I’m compiling a lot of extra drivers and modules. Once the build finishes, you should see something like this in your terminal:
1
2
3
4
5
6
7
...
  OBJCOPY arch/x86/boot/vmlinux.bin
  AS      arch/x86/boot/header.o
  LD      arch/x86/boot/setup.elf
  OBJCOPY arch/x86/boot/setup.bin
  BUILD   arch/x86/boot/bzImage
Kernel: arch/x86/boot/bzImage is ready  (#1)
OK, kernel is ready, now it is time for some spices… ekm… user space apps.
Note: Technically, you can already try booting this kernel in QEMU with
qemu-system-x86_64 -kernel arch/x86/boot/bzImageHowever, it will start booting and then crash into a kernel panic. Trust me, I’ve tried. A kernel alone isn’t enough-it needs a user-space environment to function properly. That’s the next step.
Building BusyBox
This step is actually similar to building the kernel. Fetch sources, configure, make, install. Rinse and repeat.
- Get back to you’re project root and fetch current BusyBox sources.
1
2
$ cd ..
$ wget https://www.busybox.net/downloads/busybox-1.37.0.tar.bz2
- Extract the archive.
1
$ tar -xjf busybox-1.37.0.tar.bz2
- Configure the build. This step looks similar to kernel one, with making default configuration.
1
2
$ cd busybox-1.37.0
$ make defconfig
- Make some tweaks. This distro will be small and I’m not bothering right now to deliver any system wide shared libraries, so BusyBox need to be reconfigured to build and link everything statically. Edit
.configfile and change.1 2 3 4
CONFIG_STATIC=y # static linking CONFIG_MAN=n # no manual pages CONFIG_TC=n # newer kernels does not deliver some traffic controls defines CONFIG_STATIC_LIBGCC=y # this line need to be added to config file
or you can use
sedandechoto do the job1 2 3 4
$ sed 's/^.*CONFIG_STATIC.*$/CONFIG_STATIC=y/' -i .config $ sed 's/^CONFIG_MAN=y/CONFIG_MAN=n/' -i .config $ sed 's/^CONFIG_TC=y/CONFIG_TC=n/' -i .config $ echo "CONFIG_STATIC_LIBGCC=y" >> .config
- Build.
1
$ make -j$(nproc)
Building should end up with something like
1
2
3
4
5
6
7
8
9
10
11
  AR      util-linux/lib.a
  LINK    busybox_unstripped
Static linking against glibc, can't use --gc-sections
Trying libraries: crypt m resolv rt
 Library crypt is not needed, excluding it
 Library m is needed, can't exclude it (yet)
 Library resolv is needed, can't exclude it (yet)
 Library rt is not needed, excluding it
 Library m is needed, can't exclude it (yet)
 Library resolv is needed, can't exclude it (yet)
Final link with: m resolv
We’re good to go now. Next step, make some init RAM file system and put everything together.
Making initramfs
But why?
You’re probably wondering what the heck is initramfs, and why it is needed, why RAM? I have a storage disk so why RAM?
Initramfs (initial RAM filesystem) is a small, temporary root filesystem that gets loaded into memory at boot time before the actual root filesystem is mounted. It acts as a bridge between the bootloader and the full operating system, allowing the kernel to set up everything needed to mount the real root filesystem.
How does initramfs work?
The bootloader (GRUB, Syslinux, etc.) loads both the kernel and initramfs into memory. The kernel unpacks initramfs into a temporary root filesystem stored in RAM. The init process inside initramfs runs scripts to:
- Load necessary drivers
- Set up storage (LVM, RAID, etc.)
- Mount the real root filesystem
Finally, it switches to the real root filesystem and executes the system’s main init process (like systemd or sysvinit). On real distros with real filesystem. Real filesystem? Where we going we don’t need real filesystem, Marty.
Let’s get back to work
Now that the kernel is ready, it’s time to set up an initramfs, a minimal root filesystem that will be loaded into memory at boot. This will include BusyBox as our user-space toolkit and a simple init script to launch a shell.
- Create directory for contents of our initramfs filesystem.
1
2
$ cd ..
$ mkdir initramfs
- Next, install the previously built BusyBox binaries into the initramfs directory.
1
2
3
4
$ cd busybox-1.37.0
$ make CONFIG_PREFIX=../initramfs install
$ rm ../initramfs/linuxrc
$ cd ..
- Create basic executable
initscript that will be run by kernel as a first process.1 2 3
$ cd initramfs $ touch ./init $ chmod +x ./init
- Edit this
initscript and put there below contents.1 2 3 4 5
#!/bin/sh ln -sf /dev/null /dev/tty2 ln -sf /dev/null /dev/tty3 ln -sf /dev/null /dev/tty4 /bin/sh
The script explanation:
- creates fake tty devices (tty2, tty3, tty4) because BusyBox expects them and will throw warnings if they are missing
- The most important line is /bin/sh, which launches a shell, allowing us to interact with the system.
- Since this is a very minimal system, many things are missing, there’s not even a /proc directory, meaning tools like top won`t work.
- Generate intramfs image.
1
$ find . | cpio -o -H newc > ../initramfs.cpio
Explanation:
findlists or files in current directory (intraramfs)cpio -ocreate a new archive-H newcspecifies archive format
- Run qemu to test if everything works fine. You should have running kernel with busybox userspace toolkit and root shell.
1
$ qemu-system-x86_64 -kernel linux-6.13/arch/x86/boot/bzImage -initrd initramfs.cpio
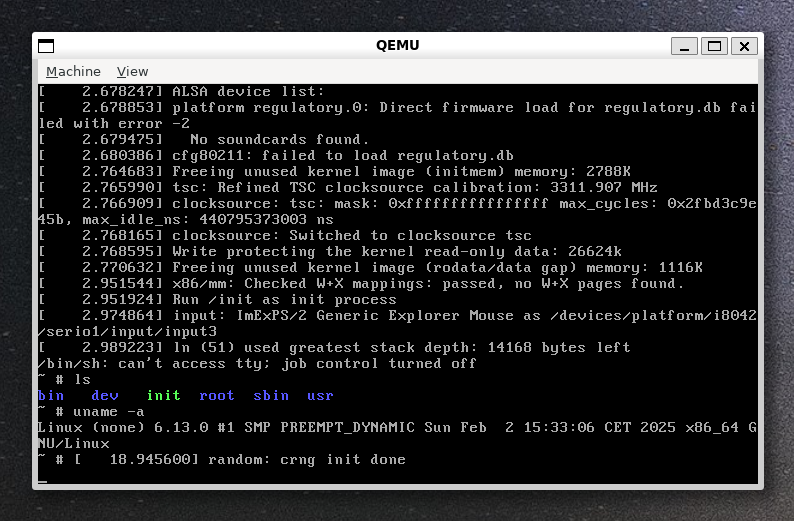
Look mum, a running “distro”
At this point, we have a working kernel with BusyBox as the user-space environment and a root shell. This setup is functional, but we can take it a step further by creating a proper disk image, installing a bootloader, and setting up a more complete filesystem.
Disk image
As a final step, we’ll create a small disk image with a FAT partition, install Syslinux as the bootloader, configure it, and copy the necessary files to make the system bootable.
- Create empty
boot.img. We’ll allocate 64MB, which is more than enough for our minimal setup.1
$ dd if=/dev/zero of=./boot.img bs=1M count=64
- Create FAT filesystem there.
1
$ mkfs -t fat ./boot.img
- Install syslinux bootloader inside the disk image.
1
$ syslinux ./boot.img - By default, Syslinux will pause at a
boot:prompt, waiting for manual input. To automate the boot process, we need to create a simplesyslinux.cfgfile.1
touch ./syslinux.cfgAdd the following content:
1
2
3
4
5
6
7
DEFAULT minimal
PROMPT 0
TIMEOUT 50
LABEL minimal
 MENU LABEL Minimal Linux
 LINUX ../bzImage
 INITRD ../initramfs.cpio
This tells Syslinux to:
- Use bzImage as the kernel
- Load initramfs.cpio as the initial RAM filesystem
- Boot automatically with default selection of boot target
minimal
- Mount image and copy all prepared files. Since mounting filesystems requires root privileges, this part is a bit tricky:
1
2
3
4
5
$ mkdir boot_mount
$ sudo mount boot.img boot_mount
$ sudo cp {linux-6.13/arch/x86/boot/bzImage,syslinux.cfg,initramfs.cpio} boot_mount
$ sudo umount boot_mount
$ rm boot_mount -rf
- Now that the disk image is ready, we can boot the system with QEMU:
1
$ qemu-system-x86_64 -drive format=raw,file=./boot.img
During boot, you’ll briefly see Syslinux initializing before it hands control over to the kernel.
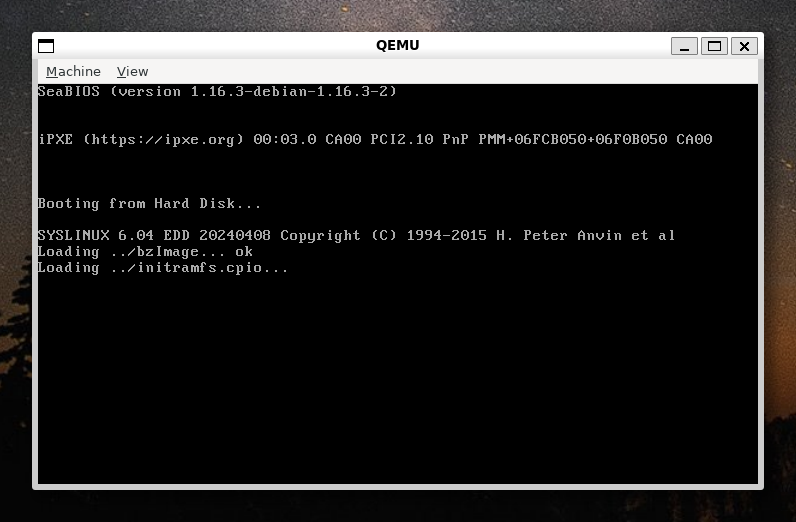
Syslinux taking care of the boot process
At this point, the system is fully bootable from a disk image rather than just using the kernel and initramfs directly.
Summary
In this blog post, we built a minimal Linux system. First, we compiled the Linux kernel and created an initramfs with BusyBox. We then tested the system in QEMU to ensure everything was working. Finally, we created a bootable disk image, installed Syslinux as the bootloader, and booted the system successfully. This process highlighted the flexibility of building custom Linux setups, and though basic, it serves as a foundation for more complex configurations and give us a solid start for further experiments.